AFO 612 – Port control
612.1 Introduction
When a user logs in, the system must know what workstation he is using, except in case of a few specific instances. The system will try to identify the workstation immediately during login. The method used for this is determined by the host operating system and the type of network.
The following options are available.
· Logging in via a network without point-to-point connections, with coding in the workstations. In this case there is no direct line (cable) between the workstation and the computer port; the physical port address varies with each login session. However, the workstation can still be identified by issuing a characteristic unique to the system. Examples of such unique characteristics, which must be setup per workstation, are:
-
IP addresses: at login the system ‘looks at' the IP address (IP = Internet Protocol) of the PC logging in. The system considers this code a logical port (/workstation) identification.
-
Auto answerback: at login the workstation sends a code (an automatic answerback), that is defined in the workstation configuration (the terminal of the PC emulation software). The system recognizes this code and considers it a logical port (/workstation) identification.
·
Logging in via a network without point-to-point connections using login scripts
If you log in via a network without fixed point-to-point connections and it is impossible to assign the workstations unique codes, you can still have workstation recognition. You must then log in using login scripts that contain information about the workstation. These login scripts are defined outside the system (for example at the network level or in the host operating system) and ensure that the system is started with special characteristics that support workstation identification. These special characteristics are thus defined in the script rather than in the workstation.
The user always logs in on a logical port, which may or may not correspond to the physical port address. You can manage these logical ports using AFO 612. The characteristics for each port are defined for this control.
Examples of port characteristics:
· the insitution /location for which the port is configured;
· a (ticket) printer is associated with the workstation;
· a special application is associated with the port.
The format of a physical port differs per hardware platform.
Examples of port formats:
· /dev/ttyaA/aAC (Unix)
· /dev/altcon (Unix)
· LTA1_ (VMS)
· 192.168.160.85 (IP address, for example with Windows 95, Windows NT Workstation or Unix).
Note!
The start screen contains a button called ‘Process Information', which gives you an overview of a number of types of data related to your process. This survey also contains the logical and physical port address for your process.
The Preferences of a user (accesible via the Settings button) have an option for port identification to be set. This can be anything from IP-address to dns-name or any other id.
Please note this must be defined in the server's port management (AFO 612). Steps are:
· 1) administrator tells staff meber what port-id will be
· 2) staff member updates cookie via the Preferences
· 3) staff member connects
· 4) administrator updates the automatically added port record in AFO 612
612.2 Control of ports
When you start AFO 612, an overview screen appears.

This screen shows a list of the (logical) ports defined within your system. This screen contains a number of the parameters to be set per logical port.
Options on the screen
: Select a port and then select this option to display the data for a logical port on the screen. An overview appears with all the data for that port. See section 612.3.
: Select one or more lines and then this option to delete the selected port(s). The system will prompt for confirmation.
: Select this option to print the data for all the logical ports. Then the program switches to the standard output procedure.
: Select this option to go to a particular place in the list. An input form will be displayed:

Enter the required port ID and click . The system will display the page that contains the port record matching your input.
Note
A blue letter I in the left hand column denotes your own port:
![]()
612.3 Configuring the ports
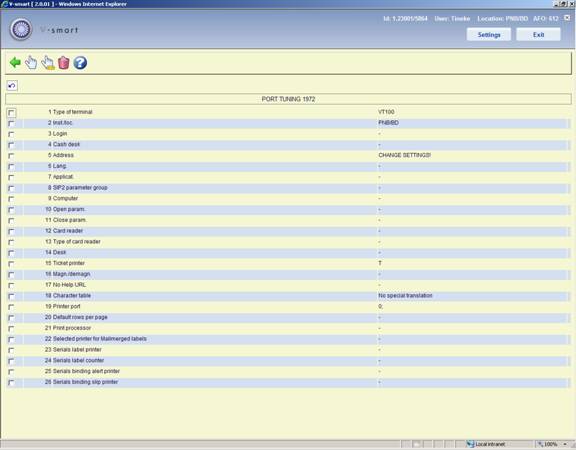
After selecting a logical port from the general screen, an overview screen appears with the particulars of the chosen port:
Options on the screen
:Select a line number and then select this option to change the data.
: Select this option to delete all port data.
: Select this option to change all port data. An input screen then appears in which you can change the data for the port:

Fields on the screen
Type of terminal - Enter the type of peripheral equipment to which the port in question is connected.
- Enter “VT100” in for a PC terminal;
- Enter “PRINT” for a printer;
- Enter “MODEM” for a modem.
Inst/location - Enter the default setting /location for the workstation. Separate the setting and the location with a forward slash (“/”) (e.g. OBG/C').
Login - If you have entered a valid LOGIN ID on this port, the automatic login occurs when this port ID record is used. I.e. the workstation using this port id will not be prompted with the Login form at all.
Cash desk - Enter the cash register to which this port is linked. This cash register must be defined in AFO 494 ‘Cash register administration: fixed file control' via the option ‘cash register control'.
Address - Enter the ‘address' where the workstation associated with this port is located. This ‘address' may be a maximum of twenty characters.
Lang. - Enter the default language for this port:
-
Enter “N” for Nederlands (Dutch);
- Enter “E” for English;
- Enter “F” for French.
Applicat - Specify whether a special application is linked to this port. Currently only the code “SIP2 (for self service stations) is valid. The system makes a distinction between applications in capital letters and those in small letters.
SIP2 parameter group – With this option you can select one of the SIP2 parameter groups as defined in AFO 481 – Miscellaneous – SIP2 Settings.
Only relevant for ports for a SIP2 device.
Computer - You can use this field to specify what computer is linked to this port. The system does not use this field. It is intended only for your administration.
Open param- Specify whether ‘open' parameters must be sent to the workstation when opening peripheral equipment connected to the workstation, such as a ticket printer, for example.
Close param - Specify whether ‘close' parameters must be sent when closing peripheral equipment connected to the workstation. Such close parameters ensure for example, that the paper is cut following printing.
Card reader - Specify what card reader must be used for information received via a card reader. The card reader is identified specifying the port number to which the card reader is linked.
Type of card reader - Specify the type of card reader linked to this port. This parameter is defined for the port to which the card reader is linked.. Valid types of card readers are:
- “FACILITY” for a ‘Facility Card' reader;
- “NC2000” for a combined Chipknip and Chipper reader;
- “MULTILINK” for a magnetic card reader
Desk - Enter the ‘desk' (department) where the workstation that is linked to this port is located. This parameter is only of interest for stack item request.
Ticket printer - Enter "T" if this port has a ticket printer, for loan slips etc., attached. Alternatively, the setting "P~//server/printer" may be entered - but you should consult Support staff, as this is an unusual setting.
Magn/demagn. - If a magnetizer/demagnetizer station is linked to the workstation, that can be specified here.
- Enter “0” if no magnetizer/demagnetizer station is connected
- Enter “1” if a magnetizer/demagnetizer station is connected
- Enter “2” if a magnetizer/demagnetizer station is connected, but not to the printer port
-
For RFID webservices, this field contains 2 parameters separated by the at sign (@).
o
The first parameter is 1 or 0, indicating that for this workstation the RFID Web services are active (1) or inactive (0).
The second parameter indicates the IP address of the RFID reader.
Both parameters are mandatory for the Web services and there is no default.
No Help url - To minimize the communications bandwidth you can set this to 1. This can be useful for instance for mobile libraries, with slower communication lines.It means the server will never send a help-url string. Therefor online help is not available from within the application. You can create a shortcut to the helpfiles on the desktop instead.
Character table - Enter “1” if no character code translation is needed. However, if a printer is connected to the port, you must enter the code for the existing character table here.
Printer port - You only need to fill in this parameter if a printer is connected to your workstation. If not, enter a minus sign ( - ). If a printer is connected to your terminal, you must enter the following two segments of the parameter; separate them with a semicolon ( ; ).
- First element in the parameter: The first element in the parameters is always “0”.
- Second element in the parameter: Enter the character table being used.
Note
Do this only if the first element in the parameter specifies that character translation is being used. Do not include a table if no character translation is being performed.
Examples
0; no translation
0; VT/P1 translation
Default rows per page – The number of rows per page may be defined for a specific “port”. If set, this will be used preferentially to the per user or general setting (as defined in AFO 611).
See the general introduction to Vubis Smart for more information on this feature.
Print processor – With this option you can assign a print processor (as defined in AFO 621 – Print processor maintenance) to the port. It is recommended to use a workstation solely dedicated to print processing.
Selected printer for mailmerged labels – With this option the user can override the selected printer defined in AFO 481 – Circulation workflow – Miscellaneous – Printing – Miscellaneous for a specific port.
Serials label printer – With this parameter, you can set for each port the printer where the serials labels will be output. See the help of AFO 354 and the general help on mailmerging for more information.
Serials label counter – With this parameter, you can define how many labels to send in one “transaction” to the printer.
For example, 5 issues of a journal are received and the Serials label counter is set to 5. In this case the 5 labels will be sent to the printer in one transaction. This will make the printing process faster.
If 7 issues are received, 5 will be printed and 2 labels will be “buffered”. If later there are other 7 issues received, the 2 left over labels will be printed + 3 labels from the new batch and there will be 4 labels left over to be printed later.
Serials binding alert printer – With this parameter, you can set for each port the printer where the serials binding alerts will be output. See the help of AFO 321 for more information.
Serials binding slip printer – With this parameter, you can set for each port the printer where the serials binding slips will be output. See the help of AFO 321 for more information.